

Step 02 → Click on “CREATE APPS” and Log in with your Gmail.

Step 03 → Now Click on “NEW PROJECT" from My Computer

Step 04 → Type a new name and click NEXT

Step 05 → Then you can see like this screen

- The above shown screen is called Designer. From this page, you can add/delete Components and modify their properties.
- On the left side of your page, numbered 1 is the Components Palette or simply Palette . This consists of various components grouped under different categories.
- When you need to add a component, you can click on the component on the Palette, hold it and drag it onto the Viewer area of the Designer page.
- On the right side, you have the Components Hierarchy and the Designer Properties Panel (which is visible when you select a component).
- The Components Hierarchy shows the visible components added into the current project. The Designer Properties Panel will be visible when clicking on a component and displays the properties of that component.
- In the middle is the Viewer which gives a mocked up view of the app as seen on a real device. To add a component to the project, drag the component from the Palette and drop it inside the Viewer.
- Below the Viewer, the Non-visible Components Panel is present, which shows all the Non-Visible Components added to the current project.
- At the top of the page, various menus and options are present.
Step 06 → Find the Button component from the Palette under the User
Interface category. Click on it, and drag it onto the Viewer, while keeping the
mouse button clicked down. Following image show how you add a component to the project.

Step 07 → Now click on the Button1 displayed on the Components
Hierarchy. By default, this is how the components are named, you can rename
them if needed. The Properties Panel for the Button should be visible now.

Step 08 → Now, find the Text property in that panel and change that to
Hello World!.

Step 09 → Then go to upper menu and click "ADD SCREEN" menu for add the another screen. If you want rename it as you wish. Then click Ok.
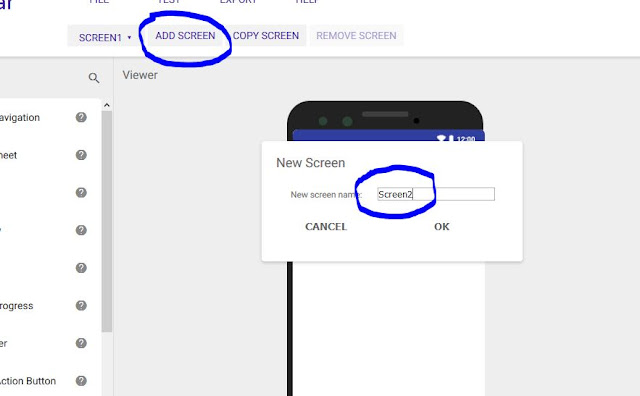

Step 10 →Now you can see the upper menu of left side, called "SCREEN1". Then click it for open second screen you have added to the project.

Step 11 →Now we are going to add a Button to Screen2 and rename it as "Go Home" . Can you remember that we did it in button1 of scrren1.

Step 12 →Now simple designing part is over. Next part is coding . Don't worry. It is so easy. You don't want any knowledge about computer language okay.. :) So do it. You can see the right side corner of the top side menu called "BLOCKS" then click it.

Step 13 →Now click on the Button 1 of the screen 2 in the left side and yellow color event block drag and drop to the design area. follow the image

Step 14 →This time select the "Control" under the "Built in". Now select the "open another screen screenName" block and drag and drop to already added block.


Step 15 →Now select the "Text" under the "Built-in" section drag and drop the empty text block to the already added block.


Step 16 → Now type another screen name in the pink color empty block

Step 17 →Now screen 2 coding is okay. Do the same thing for screen 1. Remember when you coding for screen 1 screen name will be Screen 2.

Step 18 →Now go the "EXPORT" menu in the top side and save as a .apk. now you can test your app using your device.

Step 19 → You can save your project as a AIA project file and you can also import it later.


How to use computer vision library like face recognition in kodular
ReplyDelete